AN ARRAY OF RECIPES AND TIPS

"IN THE STYLE OF" GRAHAM


9.28.2010

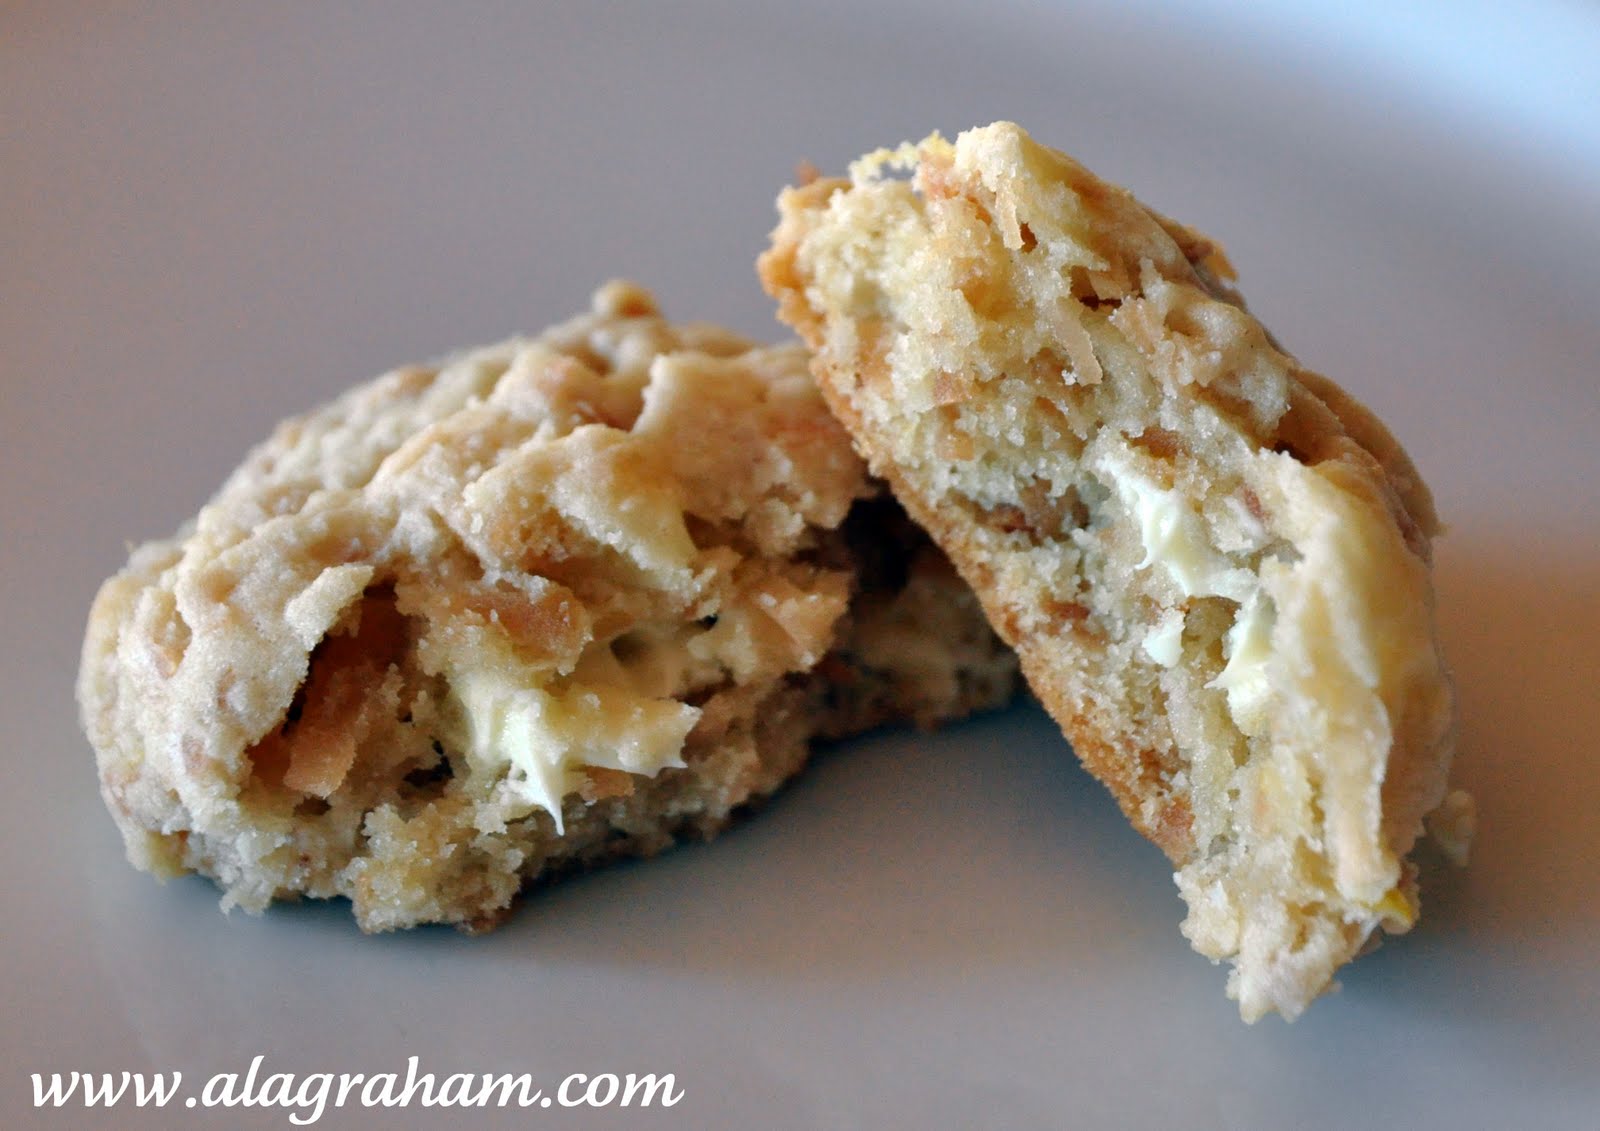
LEMON, COCONUT & WHITE CHOCOLATE COOKIES


I love it when my friends give me their fabulous recipes; no Internet searching, reading reviews, guessing if it will be good or not. My friend, Tanya loves to bake just like me and she shared this unique cookie recipe. I made a few alterations to her original recipe and I have to say these cookies are awesome...it may be one of my new favorites. They taste the best the day of or the day after.

LEMON, COCONUT & WHITE CHOCOLATE COOKIES

1 3/4 cup flour
1/2 teaspoon baking soda
1/4 teaspoon salt
1 stick of unsalted butter, softened
1/2 cup brown sugar
1/2 cup white sugar
1 egg
1 teaspoon vanilla extract
zest from one lemon
2 Tablespoons lemon juice
1 1/2 cups sweetened coconut flakes (toasted)
4 ounces white chocolate bar, (I use Ghirardelli)

Preheat oven to 350 degrees. On a baking sheet spread out the coconut flakes in a thin layer. Toast for 5-8 minutes. Stirring frequently. Watch carefully so they don't burn.

Once they are golden remove from the oven and set aside.

Zest the lemon...

Chop the chocolate...

In a medium bowl sift together flour, baking soda and salt.
In another bowl, cream together butter and sugars. Add egg, vanilla, lemon zest and lemon juice. Mix until incorporated. Add flour mixture and blend. Stir in toasted coconut flakes and white chocolate pieces.

Line baking sheet with parchment paper. Drop cookie dough onto baking sheet. I use a Pampered Chef medium scoop, approximately 2 tablespoons per cookie.

Bake for 10-12 minutes. Do not over bake. You want them to be soft in the middle and just firm enough to hold their shape when transferring to a cooling rack.

Allow to cool on a cooling rack for 10 minutes.

PRINTABLE RECIPE

9.19.2010

APPLE BUTTER- CLEAN EATING


I love this time of year...days that start out crisp and cold then slowly change into warm afternoons, leaves just starting to change color and apple trees dripping with big juicy apples.

I recently received a bag of the most delicious apples and couldn't decided what to make...really they were so good that we ate them like candy for a few days and then I decided to try something new...apple butter.

Honestly, the name always scared me away, I always thought butter was involved and was happy to find out it has nothing to do with butter. It is basically just a sweetened and thicker version of apple sauce. This is a great recipe to use up all those autumn apples.

APPLE BUTTER- CLEAN EATING
Adapted from PHOO-D
Makes Approximately 6 Cups

5 lbs. Apples, peeled, sliced, and cored
1 cup Apple Cider
1/4-1/2 cup Honey or Agave Syrup - to taste (I use honey)
1 Tablespoon Cinnamon
1/2 teaspoon Cloves
1/2 teaspoon Allspice
Pinch of Salt

Place apples and apple cider in a large pot over low heat, uncovered.

Cook apples slowly, stirring occasionally, until they begin to fall apart, about 30-45 minutes on a gas range (could take up to an hour).

Use a potato masher or a stick blender to puree the apples. You can either puree until the mixture is completely smooth or you can leave small chunks, depending on your preference.
Taste the apple puree and add in honey, brown sugar, or agave syrup until it reaches your desired level of sweetness. Stir in the cinnamon, cloves, and allspice. Continue to cook the apple puree over low heat until it thickens, stirring frequently to keep it from sticking to the bottom of the pot. The apple butter is finished cooking when you can drop a spoonful on a plate and it forms a stiff mound that does not have liquid running around the bottom edge.
Let the apple butter cool and then store it in an airtight container in the fridge for up to two weeks or in the freezer for a year.

You can use apple butter many different ways. We eat it plain, stir it into oatmeal or yogurt, on pancakes or muffins. My daughter's favorite is a piece of warm bread with homemade peanut butter, topped with warm apple butter...

PRINTABLE RECIPE

9.14.2010

SMOTHERED PORK CHOPS


The other day we were at the meat market getting all of our usual grilling food (fish and steak) for the weekend and when we got home I was surprised to find an extra package in the bag...pork chops. It seems as if we received the person's order who was standing in line behind us (we unfortunalty paid for it). I decided I better start searching for a recipe as we hardly ever eat pork. This was relatively easy and tasted great!

Smothered Pork Chops
Adapted from Tyler Florence
Serves 4

1 cup all-purpose flour
2 tablespoons onion powder
2 tablespoons garlic powder
1 teaspoon cayenne
1 teaspoon salt
1/2 teaspoon freshly ground black pepper
4 pork chops, 3/4-inch thick, bone-in
1/4 cup olive oil
1 cup chicken broth
1/2 cup buttermilk
Chopped fresh flat-leaf parsley, for garnish

Put the flour in a shallow platter (pie dish works good) and add the onion powder, garlic powder, cayenne, salt, and pepper; mix with a fork to distribute evenly. Pat the pork chops dry with paper towels to remove any moisture and then dredge them in the seasoned flour; shaking off the excess.

Heat a large saute pan or cast iron skillet over medium heat and coat with the oil. When the oil is nice and hot, lay the pork chops in the pan in a single layer and fry for 3 minutes on each side until golden brown.

Remove the pork chops from the pan and add a little sprinkle of seasoned flour to the pan drippings. Mix the flour into the fat to dissolve and then very carefully pour in the chicken broth in (I burned . Let the liquid cook down for 5 minutes to reduce and thicken slightly. Stir in the buttermilk to make a creamy gravy and return the pork chops to the pan, covering them with the sauce. Simmer for 5 minutes until the pork is cooked through. Season with salt and pepper and garnish with chopped parsley before serving.

PRINTABLE RECIPE

9.11.2010

AVOCADO SALAD- CLEAN EATING


This is one of my new favorites for using up all my garden tomatoes. The whole family loves it!

Avocado Salad- Clean Eating
Adapted from Ina Garten
Serves 6

1 pint grape tomatoes, halved
1 yellow bell pepper, seeded and 1/2-inch diced
1 (15-ounce) can black beans, rinsed and drained
1/2 cup small diced red onion
2 tablespoons minced jalapeno peppers, seeded (2 peppers)
1/2 teaspoon freshly grated lime zest
1/4 cup freshly squeezed lime juice (2 limes)
1/4 cup good olive oil
1 teaspoon kosher salt
1/2 teaspoon freshly ground black pepper
1/2 teaspoon minced garlic
1/4 teaspoon ground cayenne pepper
2 ripe Hass avocados, seeded, peeled, and 1/2-inch diced

Place the tomatoes, yellow pepper, black beans, red onion, jalapeno peppers, and lime zest in a large bowl.

Whisk together the lime juice, olive oil, salt, black pepper, garlic, and cayenne pepper...

pour over the vegetables. Toss well.

Just before you're ready to serve the salad, fold the avocados into the salad. Check the seasoning and serve at room temperature.

PRINTABLE RECIPE

9.06.2010

ROOT BEER FLOAT


I know what you are thinking, 'A recipe for a root beer float!', pretty basic I know. But this isn't so much a recipe as it is a reminder of something nostalgic (for most of us), delicious and easy to make.

How can a root beer float not bring you complete joy!? For me it reminds me of being a kid sleeping over at my grandparents' house. I can remember sitting in the kitchen at night and waiting for my bedtime snack which always involved ice cream. Sometimes root beer floats, sometimes she used Pepsi, sometimes it was vanilla ice cream with raspberries on top.

The love for ice cream must be genetic because my day is not complete unless I have ice cream before bed. Root beer floats are my new addiction for the week...little Kahlua, Bailey's or Bourbon...the perfect nightcap!

Root Beer Float

pint glass
2 scoops of vanilla ice cream
1/2 can root beer
shot of liquor, Kahlua, Bailey's or Bourbon (optional)

Add the ice cream and liquor (if using) to the glass and slowly pour the root beer down the side of the glass. Serve immediately.

PRINTABLE RECIPE

RED POTATO AND TOMATO SALAD- CLEAN EATING


This salad is great especially for those of you who love the idea of a potato salad but not the idea of mayo. Perfect for a picnic on these last few fleeting days of summer. My tomato plants have been picked clean; now we'll see if the few remaining ripen before a frost...autumn weather is here in South Dakota.

Red Potato and Tomato Salad- Clean Eating
Adapted from Giada De Laurentiis
Serves 4

1 pound baby red potatoes, cubed bite size
1 pint (2 cups) cherry tomatoes, halved
3 scallions, thinly sliced
1/3 cup pitted black olives, halved
1/4 cup chopped fine fresh flat-leaf parsley
2 tablespoons capers, rinsed and drained
1 tablespoon chopped fresh thyme leaves
1/4 cup extra-virgin olive oil
1 large lemon, zested
Kosher salt and freshly ground black pepper

Add the potatoes to a medium saucepan with enough cold water to cover by at least 2 inches. Set the saucepan over medium heat. Bring the water to a boil and continue boiling until the potatoes are tender, about 15 to 20 minutes.

Meanwhile, in a bowl, add the tomatoes, scallions, olives, parsley, capers, thyme, olive oil, and lemon zest.

Once the potatoes are cooked, drain the potatoes in a colander and allow them to dry for 5 minutes. Then add the potatoes to the rest of the salad, toss gently until all the ingredients are coated and season with salt and pepper, to taste.

Refrigerate for 1 hour and gently toss again before serving.


PRINTABLE RECIPE

9.02.2010

GREEN BEANS WITH POTATOES AND GARLIC- CLEAN EATING


Here is another great recipe for a tasty side dish to just about anything. The vegetables are the highlight of this dish so make sure that you have fresh produce. If I were to make this again I would probably double the garlic. It tastes great hot or even at room temperature.

Green Beans With Potatoes and Garlic- Clean Eating
Adapted from Martha Rose Shulman
Serves 4

3/4 pound green beans
1 pound red waxy potatoes
2 tablespoons extra virgin olive oil
2 to 3 large garlic cloves (to taste), minced
Salt and freshly ground pepper to taste
2 hardboiled eggs, diced (optional)

Wash potatoes and beans.

Cut potatoes in to 2-inch wedges. Trim and break beans in half...

Steam the green beans above 1 inch of boiling water for four to five minutes until tender. Remove from the steamer, and rinse with cold water. Set aside. Add the potatoes, and steam for about 15 minutes or until very tender.

Heat the oil over medium heat in a large, nonstick skillet. Add the garlic, and cook for a minute or so until the garlic is fragrant. Stir in the beans and cook, stirring, for three - five minutes until quite tender and coated with oil (but still bright green).

Gently stir in the potatoes, and add salt and pepper (to taste) (a little red pepper if you want heat). Cook, stirring, until they begin to color lightly. Scatter the diced hard-boiled eggs over the top, cover and turn heat to low. Cook another three minutes. Serve hot or warm.

PRINTABLE RECIPE

8.30.2010

HOMEMADE PEANUT BUTTER


As a child I hated peanut butter. I never liked it until I was 26 years old and vacationing in Hawaii with my husband. Each morning I would wake up with a severe Jif creamy peanut butter craving...the "do not mess with me until I have had my coffee peanut butter" kind of morning. I finally found satisfaction when one of the hotel workers was kind enough to dig in the back of the kitchen and find a huge economy size jug of Jif creamy peanut butter (it was seriously like a foot tall)...I can only imagine the shelf life of that peanut butter...makes me shiver.

As I sat on the balcony, in the early hours of the morning, eating my bowl of Jiff creamy peanut butter with a plastic spoon and pondering my new love for it; it occured to me that maybe I was pregnant...8 months later my little girl was born, a natural peanut butter lover!

I have loved peanut butter ever since and have even managed to curb my addiction from Jif creamy peanut butter to something a little more healthy. This is it! I will never go back to store bought peanut butter; with homemade, it is much healthier and the flavor is intense!

Homemade Peanut Butter
Adapted from Alton Brown
Makes about 1 1/2 cups

15 ounces (scant 2 cups) shelled and skinned roasted peanuts, recipe follows
1 teaspoon kosher salt
1 1/2 teaspoons honey
1 1/2 tablespoons peanut oil

Place the peanuts, salt and honey into the bowl of a food processor.


Process for 1 minute.

Scrape down the sides of the bowl. Place the lid back on and continue to process while slowly drizzling in the oil and process until the mixture is smooth, 1 1/2 to 2 minutes.


NOTE: Add more oil if a creamier texture is desired. I found it hard to spread (especially after being refrigerated) using this amount of oil but I preferred it that way because it is healthier and still tastes great.

NOTE: I buy already roasted peanuts but if you want to roast them yourself follow Alton's directions below.

Roasted Peanuts:
2 pounds in-shell raw peanuts*
2 tablespoons peanut oil
1 to 2 tablespoons kosher salt
*Cooks note: Use Spanish peanuts for peanut butter as they have a higher oil content.

Preheat the oven to 350 degrees F.

Rinse the peanuts under cool water to remove excess dirt. Pat dry and place in a large bowl and toss with the peanut oil and salt until well coated.

Place on 2 half sheet pans, making sure to spread them out into a single layer. Roast in the oven for 30 to 35 minutes, rotating the pans halfway through cooking. Once you remove the peanuts from the oven, let them cool slightly before eating. They will continue to "cook" and become crunchy as they cool.

If using peanuts to make peanut butter, remove shells and discard. Remove the skin by rubbing the peanuts together in your hands held over a salad spinner, allowing the peanuts and skins to fall into the bowl. Once the skin has been loosened from all of the peanuts close the salad spinner and spin until all of the skin has been separated from the peanuts.

Yield: Approximately 2 pounds roasted peanuts in shell

PRINTABLE RECIPE

8.21.2010

CHOCOLATE CHUNK OATMEAL COOKIES WITH PECANS AND DRIED CHERRIES


I have certain moments in my day-to-day life where I freak out and have to clean my house and then that is followed by a serious need to bake...today was one of those days and unfortunately it coincided with 90 degree weather. While the rest of my family was outside swimming and enjoying the day, I was on my hands and knees scrubbing the floor, the fronts of my cupboards and thinking about the perfect cookie flavor combinations. Can you tell I am stressed? This is what I do when I am stressed...Clean, Bake, Eat.

Anyway... these cookies are good! So good that when I was baking the last batch I went to the kitchen when I heard the timer and saw 6 missing cookies from the cooling racks. I thought "wow, 6 cookies in less than 15 minutes is impressive!" However, it came to mind that it could've been this little thief that lives in my house and sleeps in my bed...BUDDY.

He has been known to help himself to whatever he feels like...

exhibit A
One pound of butter with a side of cardboard...missing

exhibit B
17 Christmas cookies in the front row with slober still on the waxed paper...missing

Luckily my husband fessed up this time and Buddy was in the clear...as well as the rest of oatmeal cookies.

I learned a few years ago that dried cherries and chocolate are my favorite combination of flavor in cookies. The tart cherry flavor really compliments the richness of the chocolate...you have to try them.

Chocolate Chunk Oatmeal Cookies with Pecans and Dried Cherries
Adapted from Cooks Illustrated, May 2005
Makes 20 Cookies

1 1/4 cups unbleached all-purpose flour
3/4 teaspoon baking powder
1/2 teaspoon baking soda
1/2 teaspoon salt
1 1/4 cups old-fashioned rolled oats
1 cup pecans, toasted and chopped
1 cup dried sour cherries or cranberries, chopped coarse
4 ounces dark chocolate, chopped into small pieces about the size of chocolate chips
3/4 cup (12 tablespoons, 1 1/2 sticks) unsalted butter, softened but still cool
1 1/2 cups packed dark brown sugar
1 large egg
1 teaspoon vanilla extract

NOTE: Original recipe calls for bittersweet chocolate

Preheat oven to 350°F (175°C). Use parchment paper to line several standard baking sheets and set aside.

In a bowl, sift together the flour, baking powder, baking soda and salt.

In another bowl combine the oats, pecans, dried cherries and chocolate.

In the bowl of a stand mixer with the paddle attachment, or with a hand mixer, cream together the butter and brown sugar on medium speed until light and fluffy, scraping down the sides of the bowl as needed. With the mixer on medium-low, add the egg, vanilla and beat until incorporated.

Scrape down the sides of the bowl, turn the mixer to low, and add the flour mixture to the bowl. Stir until just combined. Finally incorporate the oats, nuts, cherries and chocolate. Do not over mix. Turn off the mixer and use a rubber spatula to give the dough a final stir and make sure that all the ingredients are incorporated.

I use the Pampered Chef Large Scoop when making these cookies (approximately measures 3 tablespoons). Scoop cookies and drop on parchment lined baking sheets.

NOTE: the original recipe suggests using an ice cream scoop to measure 1/4 cup portions of dough. If you use this amount of dough per cookie you will need to bake for approximately 20 minutes and the total yield will be 16 cookies.

Bake until the cookies are uniformly golden, but still wet in the middle, about 15 minutes. You might think that they're undercooked, but you're wrong - resist the urge to over bake, they will set up further as they cool.

Remove from the oven and cool on the baking sheets for 5 minutes before transferring to a wire rack. Store cooled cookies in an airtight container at room temperature.

PRINTABLE RECIPE

8.17.2010

WHITE CHOCOLATE CUPCAKES WITH STRAWBERRY FROSTING


My neighbor just had a sweet baby girl and my friend's son just turned 3 so it was the perfect day to make cupcakes, for everyone!

I absolutely love the cake in this recipe. The frosting was ok but I think it misses something when you don't add the cream. Next time I will probably use my traditional buttercream frosting (recipe follows).

I piped the frosting on using a plastic bag (corner cut off) and dipped strawberries in dark chocolate, then drizzled white chocolate on once dry. The batter filled 6 large cups in the picture shown or it would fill a 12 capacity regular muffin tin. I use a large Pampered Chef Scoop when filling regular muffin tins.

White Chocolate Cupcakes with Strawberry Frosting
Adapted from Gourmet Traveller
Serves 12

125 gm (8.82 tablespoons) soft unsalted butter
110 gm (1/2 cup) sugar
3 eggs
80 gm (6 chocolate squares, 6 ounces) white chocolate, melted
110 gm (3/4 cup) all purpose flour
1 teaspoon baking powder

Strawberry frosting
250 gm (about 18 tablespoons) soft unsalted butter
1 cup powdered sugar, sifted
150 gm (about 7 medium) strawberries, puréed and strained

Using an electric mixer, beat butter and sugar until light and fluffy, add eggs one at a time, beating well after each, then add the melted white chocolate

and stir to combine. Sift flour and baking powder over cake batter and fold in until combined. Line muffin tins with 12 paper cases, then divide mixture among cases and bake at 150F/180C for 20 minutes or until cakes spring back when lightly pressed.

For strawberry frosting, puree the strawberries,

Using an electric mixer, beat butter until pale and fluffy, add icing sugar and beat until soft peaks form, then add strawberry purée and beat until combined. Spread or pipe frosting over cupcakes and serve. Cupcakes will keep in an airtight container for up to 3 days.

If you want to try a more traditional buttercream frosting recipe, this is one I use often.

Traditional Buttercream Recipe
Adapted from Magnolia Bakery
Makes enough for 12 cupcakes

1/2 cup (1 stick) unsalted butter, softened
3-4 cups confectioners’ sugar
1/4 cup milk
1 teaspoons vanilla extract

Place the butter in a large mixing bowl. Add 2 cups of the sugar and then the milk and vanilla. On the medium speed of an electric mixer, beat until smooth and creamy, about 3-5 minutes.

Gradually add the remaining sugar, 1 cup at a time, beating well after each addition (about 2 minutes), until the icing is thick enough to be of a good spreading consistency. You may not need to add all of the sugar.

PRINTABLE RECIPE

8.16.2010

BEEF AND RICE


So I am back from Mexico...it was amazing! Probably one of the best vacations we have taken yet. We literally laid on the beach; all day, every day. We managed to squeeze in some deep sea fishing, snorkeling, walking and of course a lot of eating!
Now that I am back to reality and trying to get into the swing of things I had to hurry tonight to get a meal cooked. I found this great recipe; super easy, quick and tastes great. You could eat it alone with a side of veggies, wrap it up in a tortilla, or with a side of tortilla chips. My husband added hot sauce to kick up the heat but the kids and I thought it tasted great without.

Beef and Rice
Adapted from Lynn's Kitchen Adventures
Serves 4

1 pound lean ground beef
1 medium onion, chopped
1 can (14 ounces)diced tomatoes with liquid
2 cups beef broth
1 cup rice
1 teaspoon chili powder
1 can (14 ounces) black beans (optional)

In a large skillet, cook ground beef with onion until the meat is no longer pink; drain.


Stir in remaining ingredients;

bring to a boil. Reduce heat; cover and simmer for about 20 minutes or until rice is tender.

I like mine with black beans but my husband prefers his without; either way it tastes great!

Here are some pictures from our Mexico trip...


PRINTABLE RECIPE

LinkWithin

Related Posts with Thumbnails